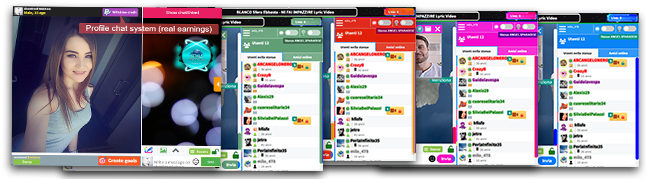
HTML5 VIDEOCHAT
BEnhance Your Website with Powerful Chat Software – Try Our Video Chat Today!


BEnhance Your Website with Powerful Chat Software – Try Our Video Chat Today!
Enter a world of vibrant communication! Our 19.99 EUR per month chat licenses provide a complete service. Seeking a simple way to create your customized video chat? You're in the right place. Our script allows easy customization - room name, participants, and privacy settings, no technical expertise needed! With dedicated support, we're here for a smooth experience. Access the complete service with no hidden costs. Users have total control: deactivate subscription anytime. Ready for uncomplicated, custom video chats? Hit signup; explore engaging communication!


Choose to have a Radio Server
Here's your chance to get a free radio server. With a modest subscription, you can use Centova Cast to go live with your DJs and music. Contact us to learn more or take a look below. No other service offers such competitive pricing.
HTML5 radio-videochat offers free online radio servers. Secure your own server and launch your internet radio station at no cost!
The server itself is free; however, the Centova service is available for just 5 euros per month, already set up and ready for use.
AutoDJ allows you to upload music and pre-recorded shows to your free radio server, essentially creating a personalized music cloud. With this feature, you can effortlessly generate playlists online, enabling you to listen to and share your stream on the internet. Best of all, everything is accessible through your web browser, eliminating the need for any installations on your computer.
You have a storage capacity of 1GB for your tracks. If it reaches its limit, you'll need to remove old tracks to make space for new uploads.
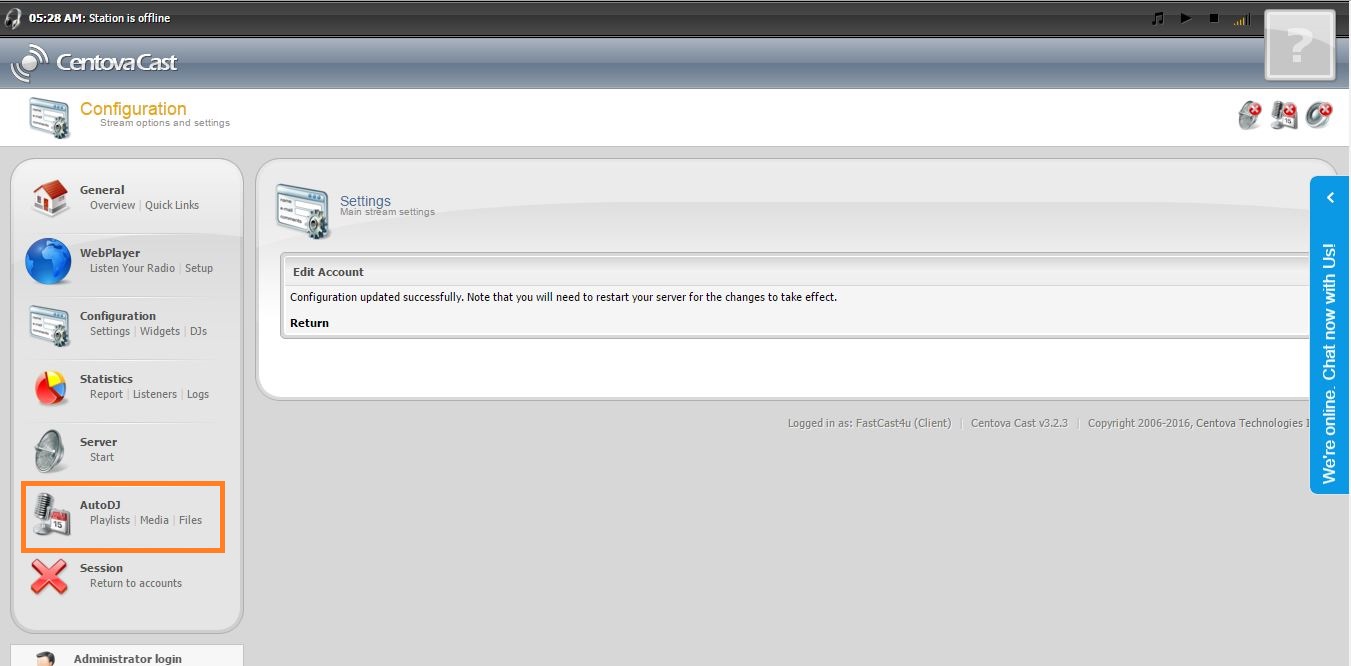
When setting up a new server, AutoDJ is typically disabled by default. To enable AutoDJ, follow the instructions outlined below. 1. Stop your server 2. Go to Settings -> AutoDJ -> Permitted and enabled. 3. Select -> AutoDJ -> Permitted and enabled and click Update 4. AutoDJ icon should appear in the menu Please note: The server will not start unless files are uploaded to the server and added to a playlist. After enabling AutoDJ, you can upload audio files to the server by navigating to AutoDJ -> Files -> Upload. 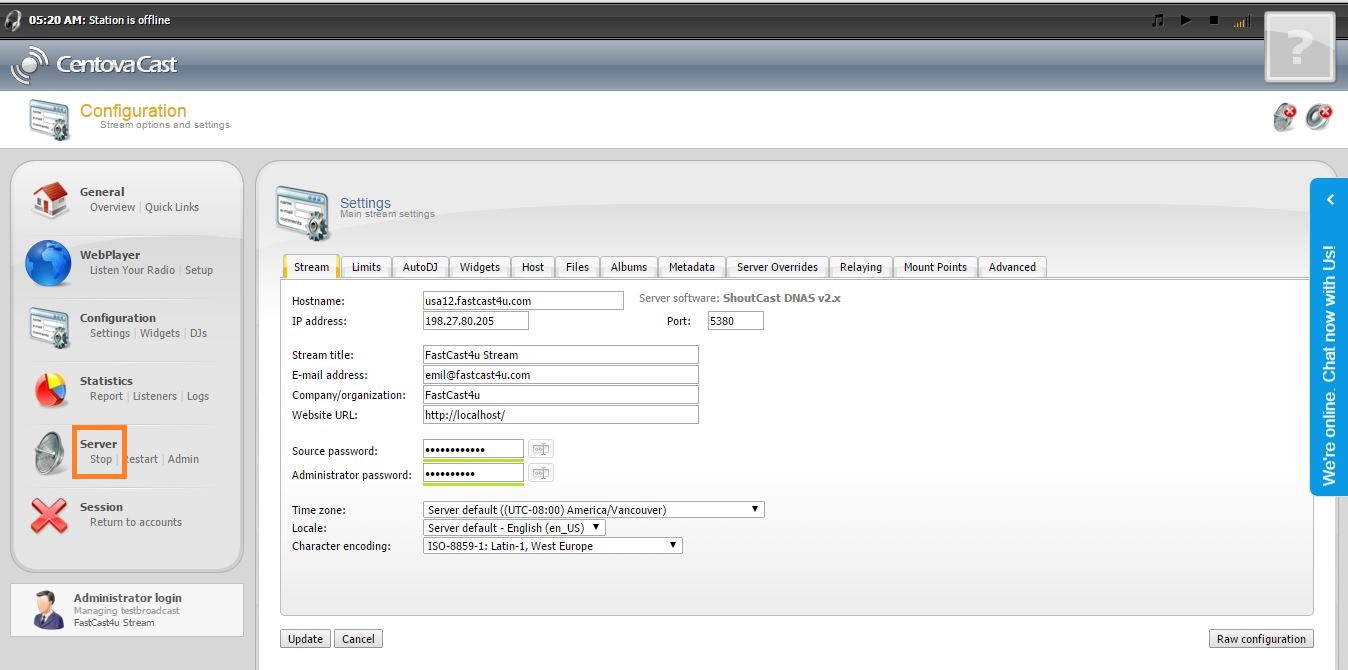


To learn how to add tracks to playlists in AutoDJ see the tutorial below: 1. Click on the 'MEDIA' hyperlink located in the panel on the left side of the Centova Control Panel, under the AutoDJ section. 2. Drag and drop an artist, album, or song of your choice into the desired playlist. You can hold the CTRL button to select multiple entries.
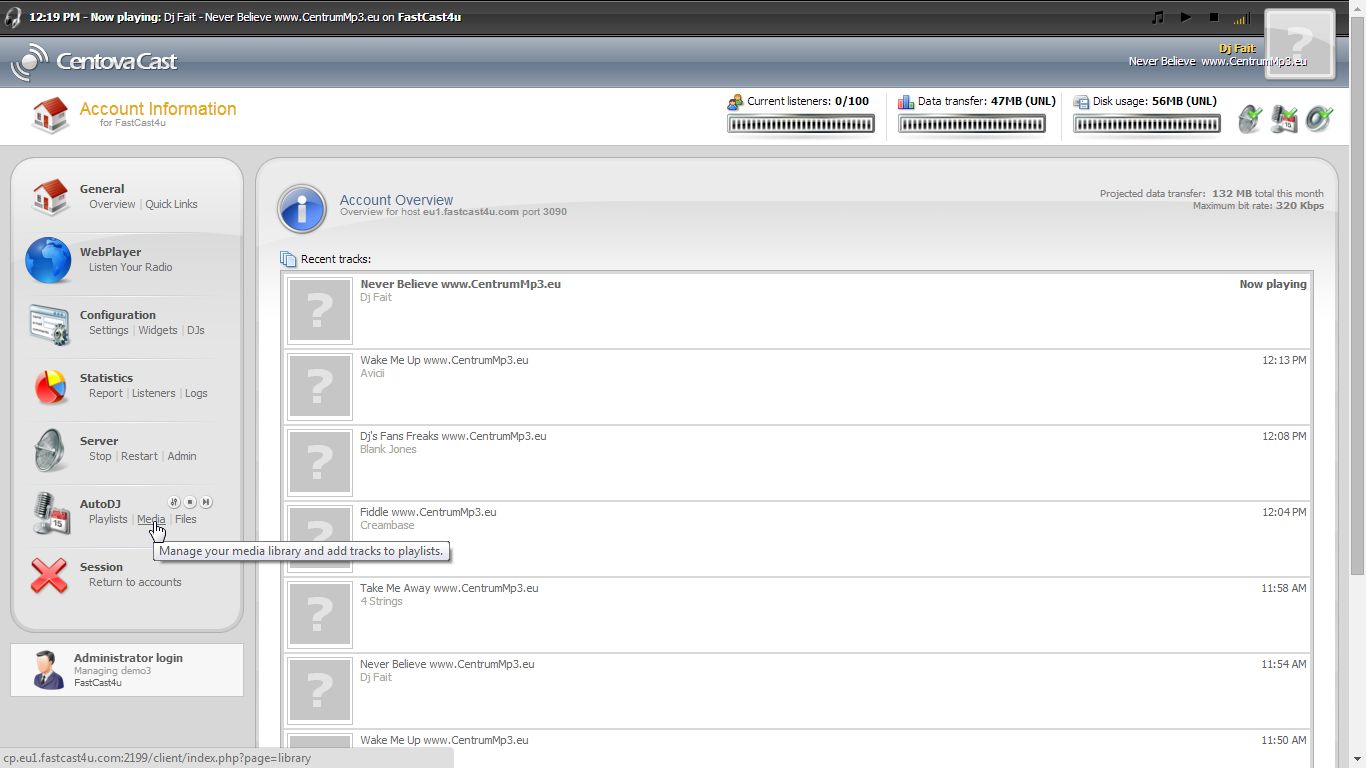


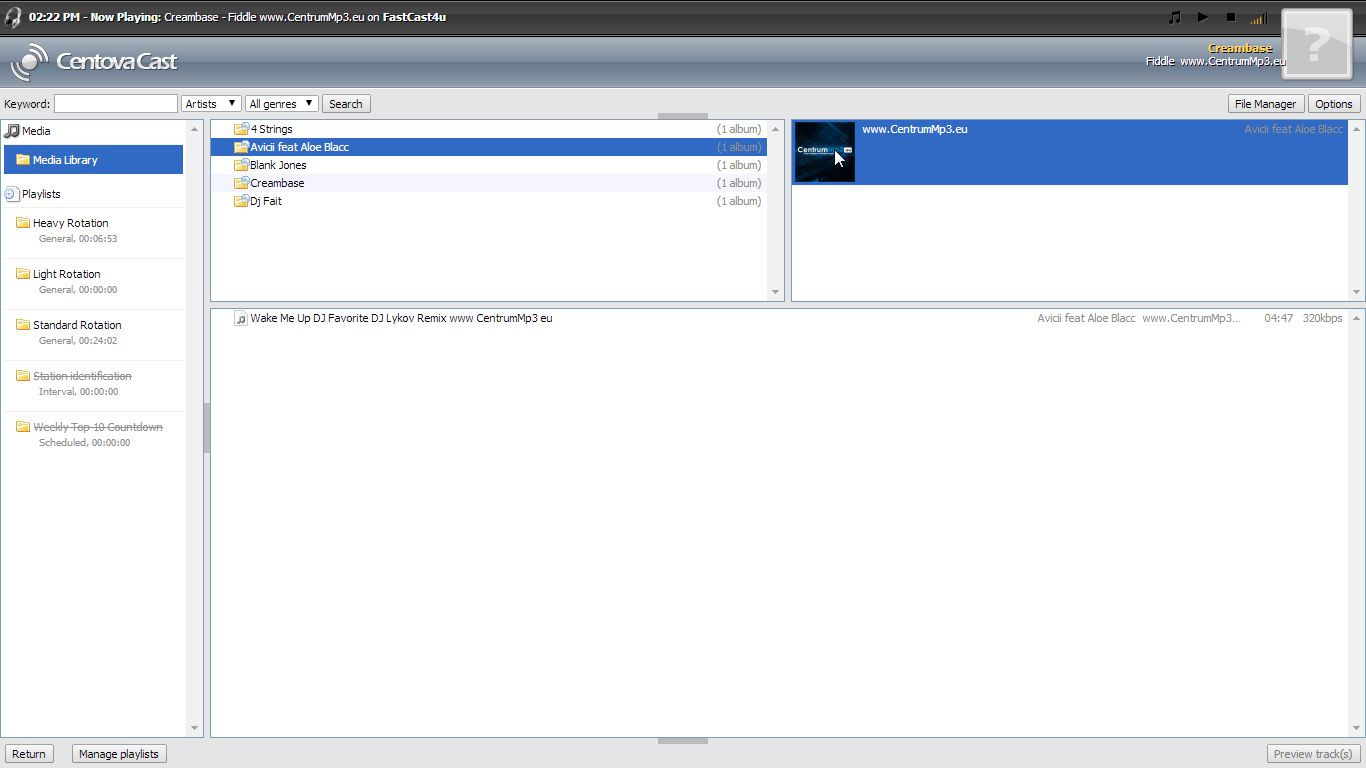

3.In order to go back to the main Centova Control Panel click RETURN at the bottom of the page.
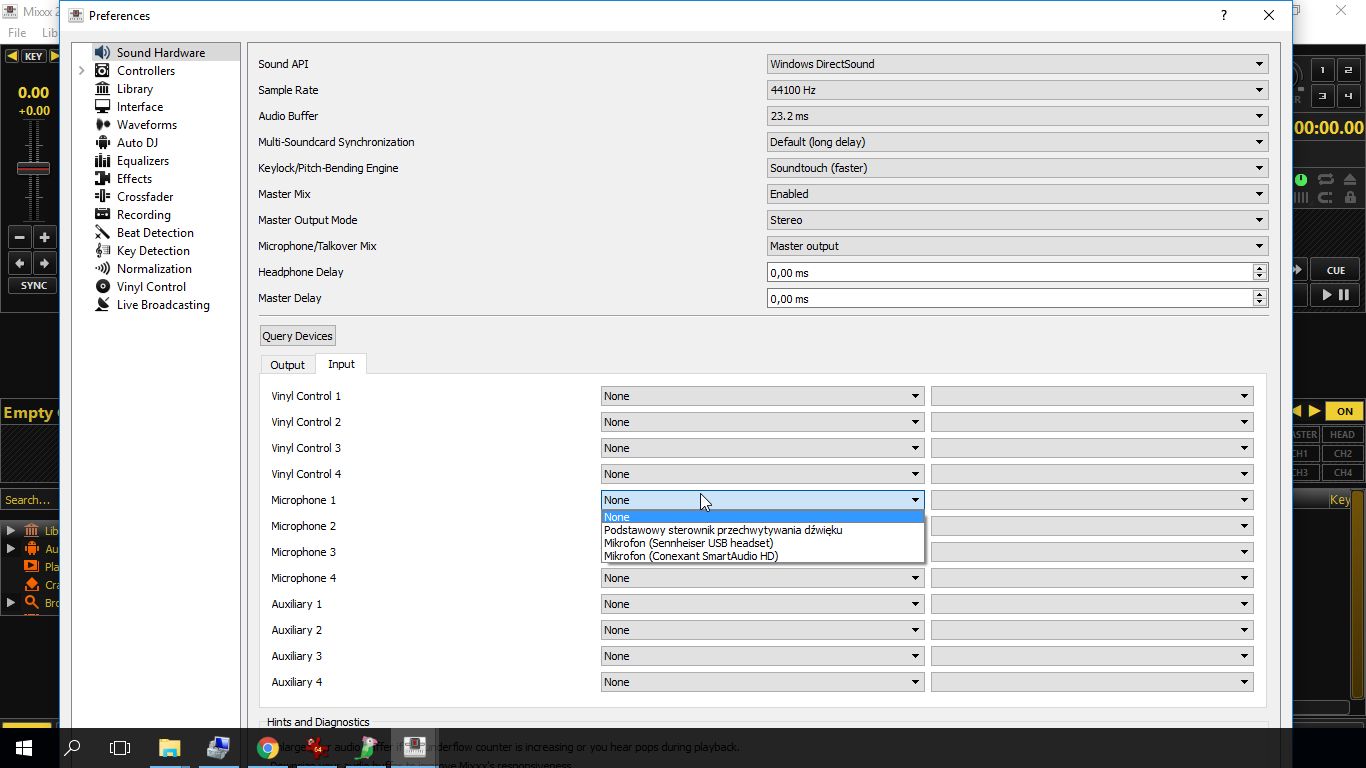
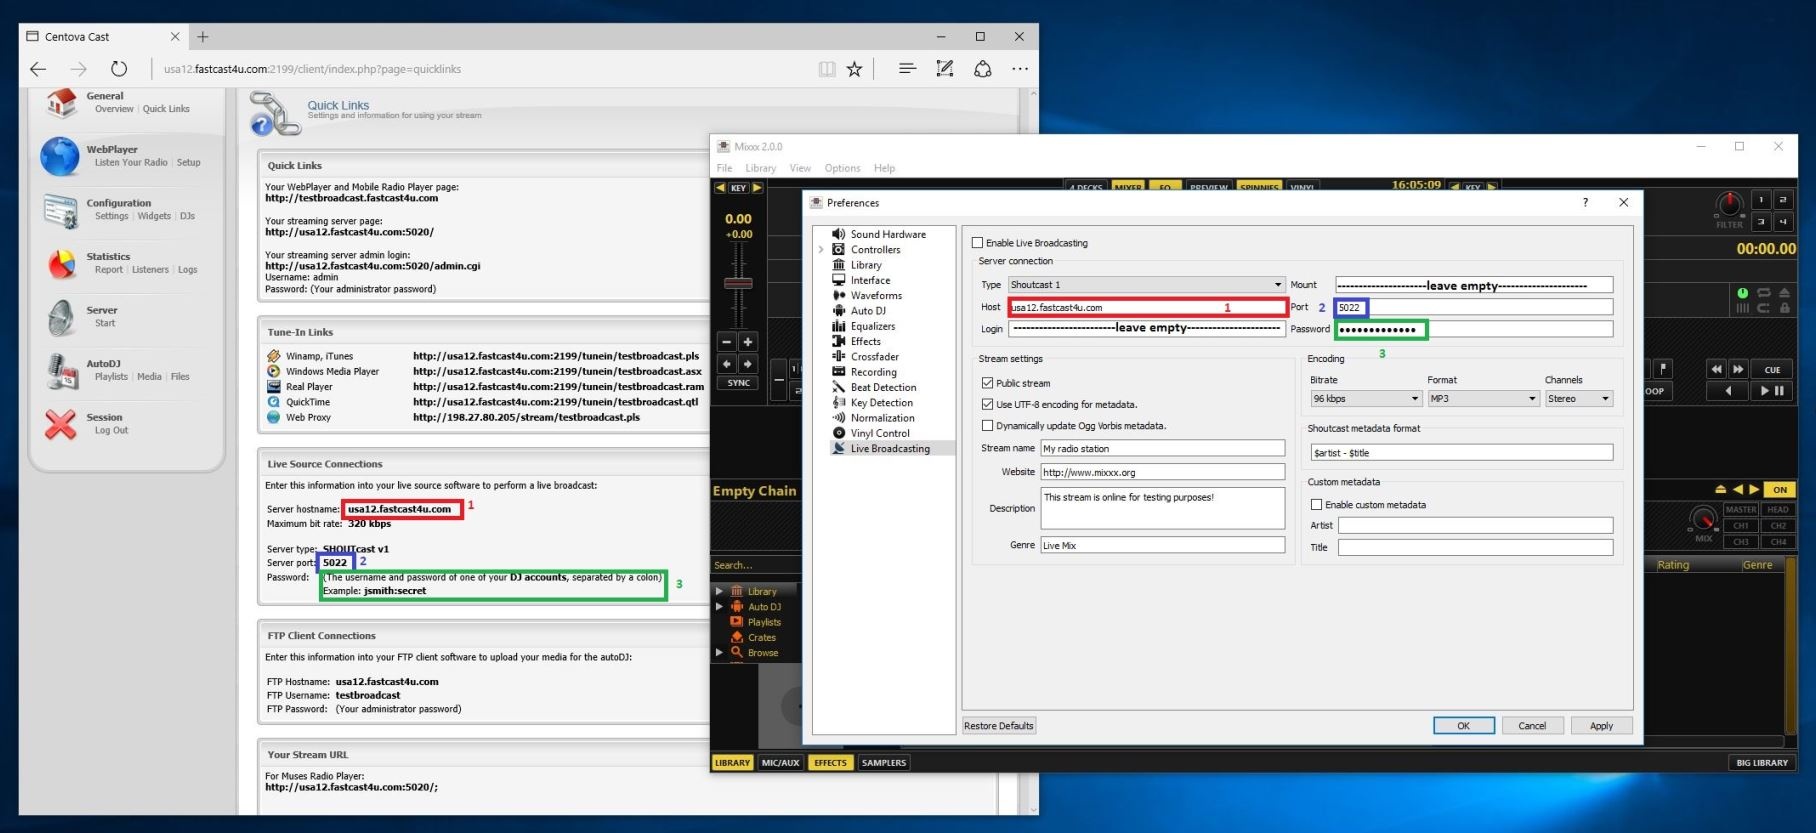
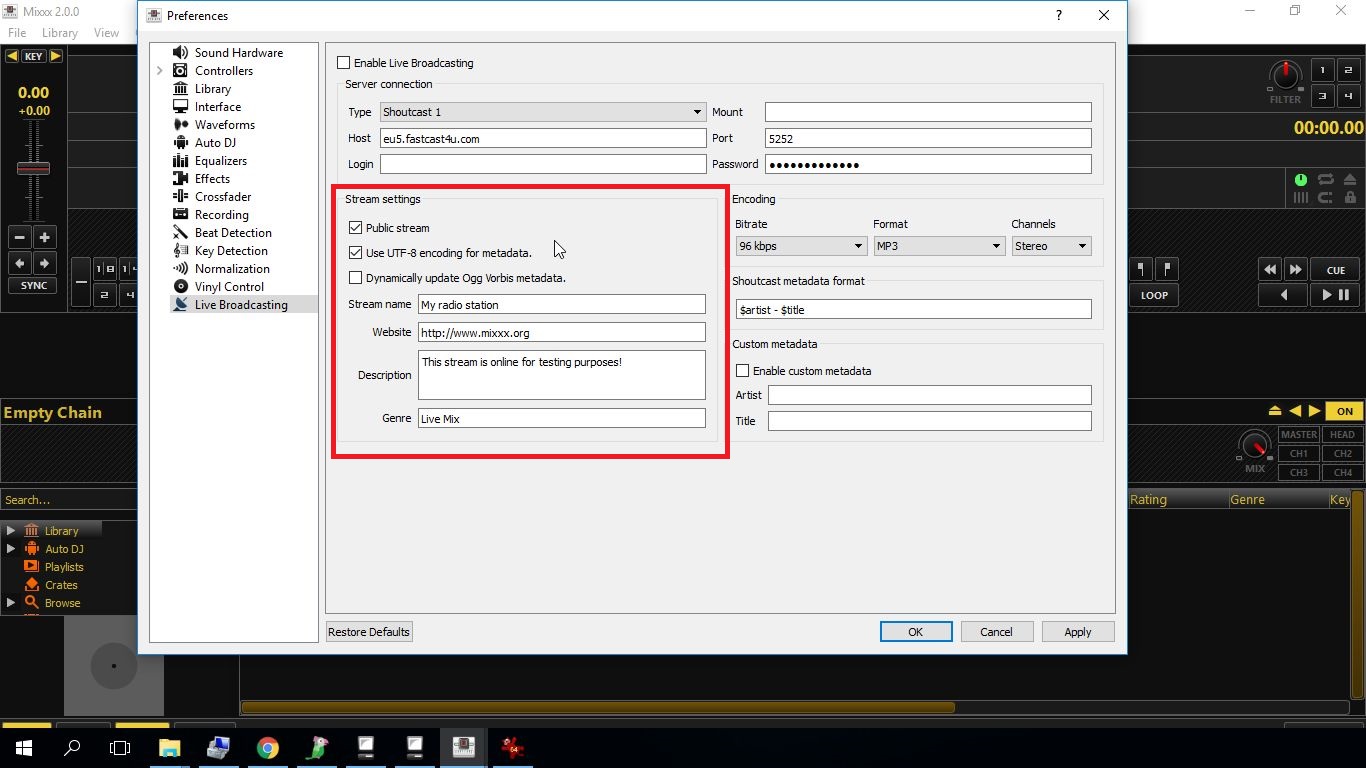
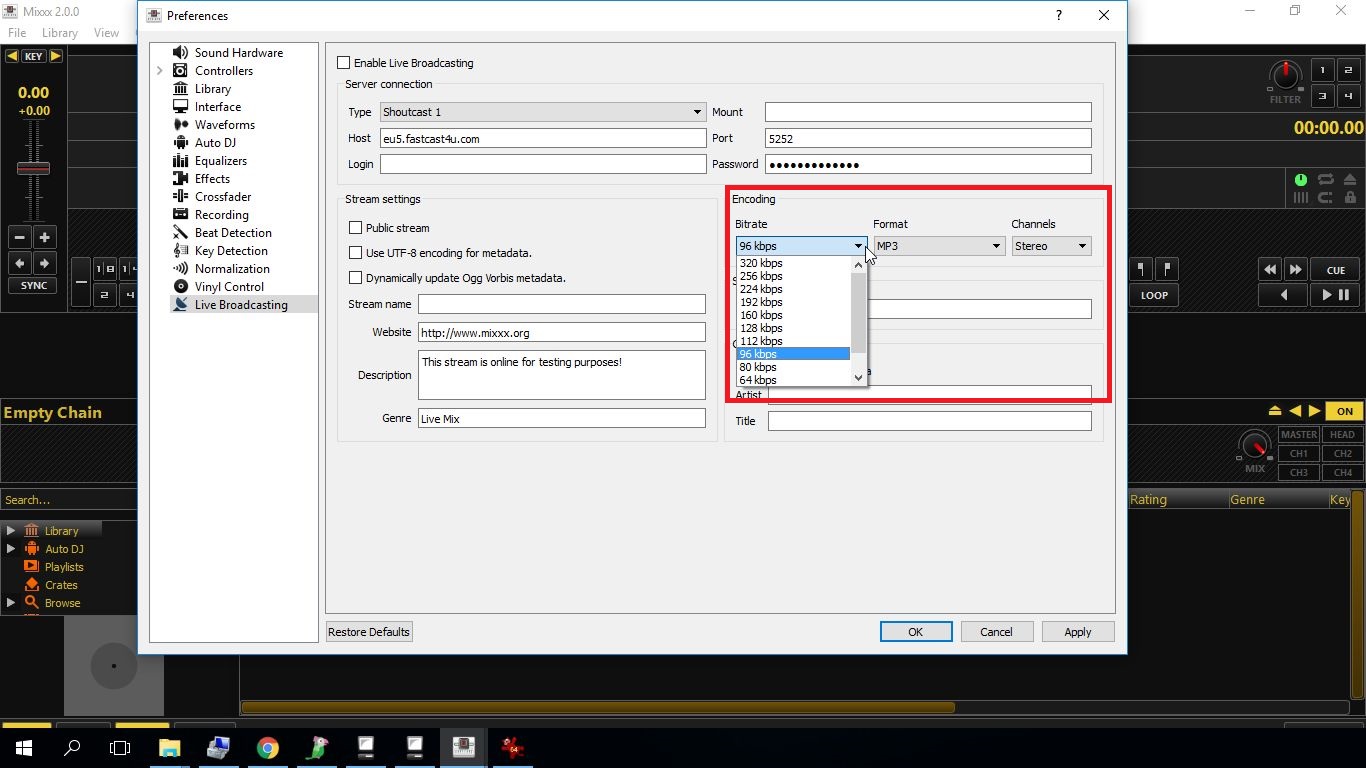
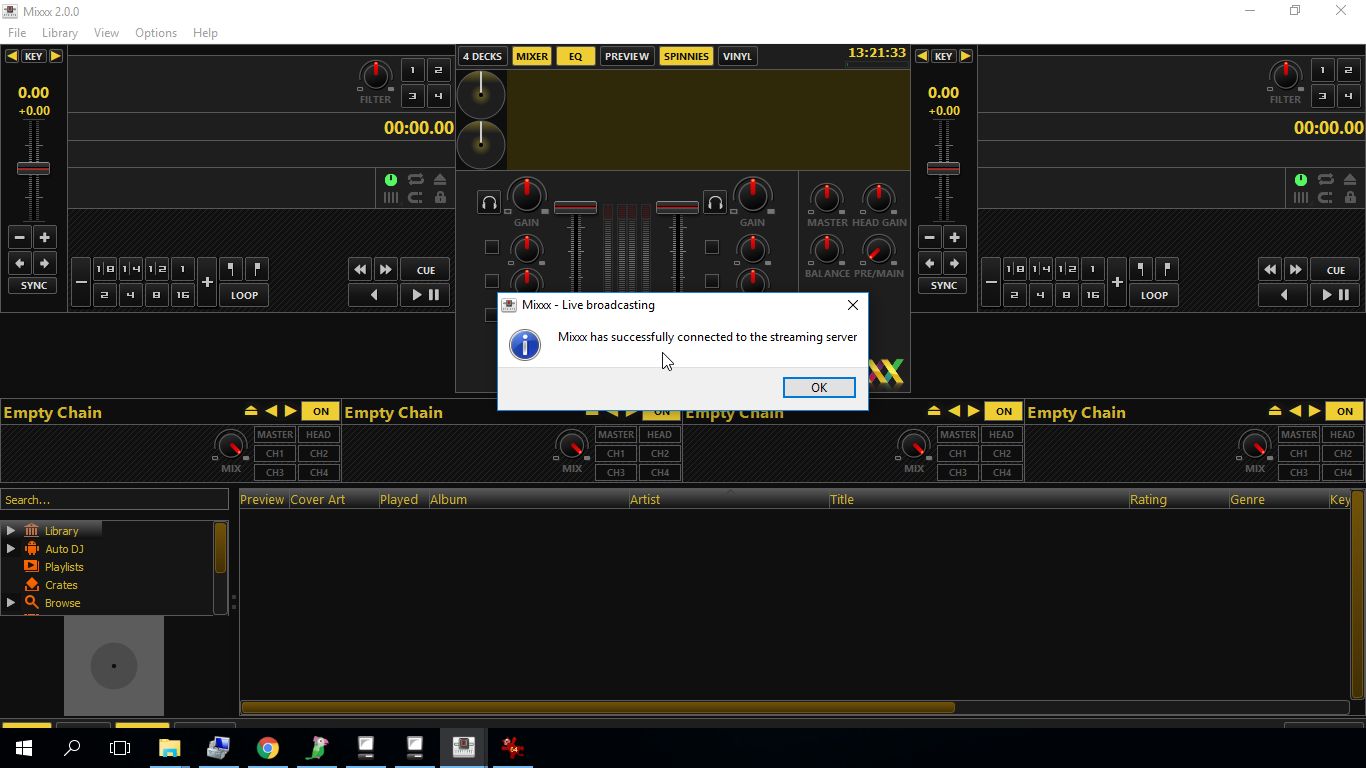
If you would like to start broadcasting live using Mixxx, make sure you have all the software required: Download and install Mixxx: mixxx.org/download Download Lame MP3 codec and install it having installed Mixxx first. 1. First of all, if you would like to use AutoDJ and broadcast live using Mixxx, you need to create at least one DJ account in Centova Cast Control Panel by selecting the DJ option in the menu of Centova Cast Control Panel. Restart the server after adding each DJ account. Only one DJ can be connected to the server at the time. If you do not use the AutoDJ feature or have a server without AutoDJ, you can skip this first step. 3. If you would like to use a microphone, select it in the Input devices section. 4. To configure the connection to your Radio Server, select Live Broadcasting in the menu. 5. Open the Centova Cast Control Panel of your Radio Station and copy the following details from the Quick link section of your server: - Hostname (1) - Port number (2) - as the password use the password and username of the DJ account that you have created separated by a colon (:), e.g. "testdj:mypassword" (3) or source password that you have received by email. - Mount and Login – leave empty as presented below: For a server with AutoDJ and a DJ account: A server with no AutoDJ and no DJ account: 6. Fill in Stream details, it is up to you what details will you use. These are Stream Details that will be seen by your listeners. We also recommend selecting the Public server option and UTF-8 encoding for metadata. 7. Select the bitrate (audio quality) of the stream. If you use AutoDJ the bitrate of your live stream should be the same as the bitrate of your server/AutoDJ. If you do not use AutoDJ make sure that broadcasting bitrate does not exceed the maximum bitrate of your server. You can check the maximum broadcasting bitrate of your server in the Quick links section of your Centova Cast Control Panel. Select the audio coded for your stream. We recommend broadcasting in MP3 file format because it is supported by most of the players on the Intenet. Click Enable Live Broadcasting to connect to the server and start broadcasting live. You should see a confirmation that Mixxx has been successfully connected to the server: If you see the same message as below, sure that you have downloaded and installed the Lame MP3 codec from our website Untick the Enable Live Broadcasting option to disconnect from the server. You are ready to start broadcasting live!
2. Open Mixxx and select Options and Preferences: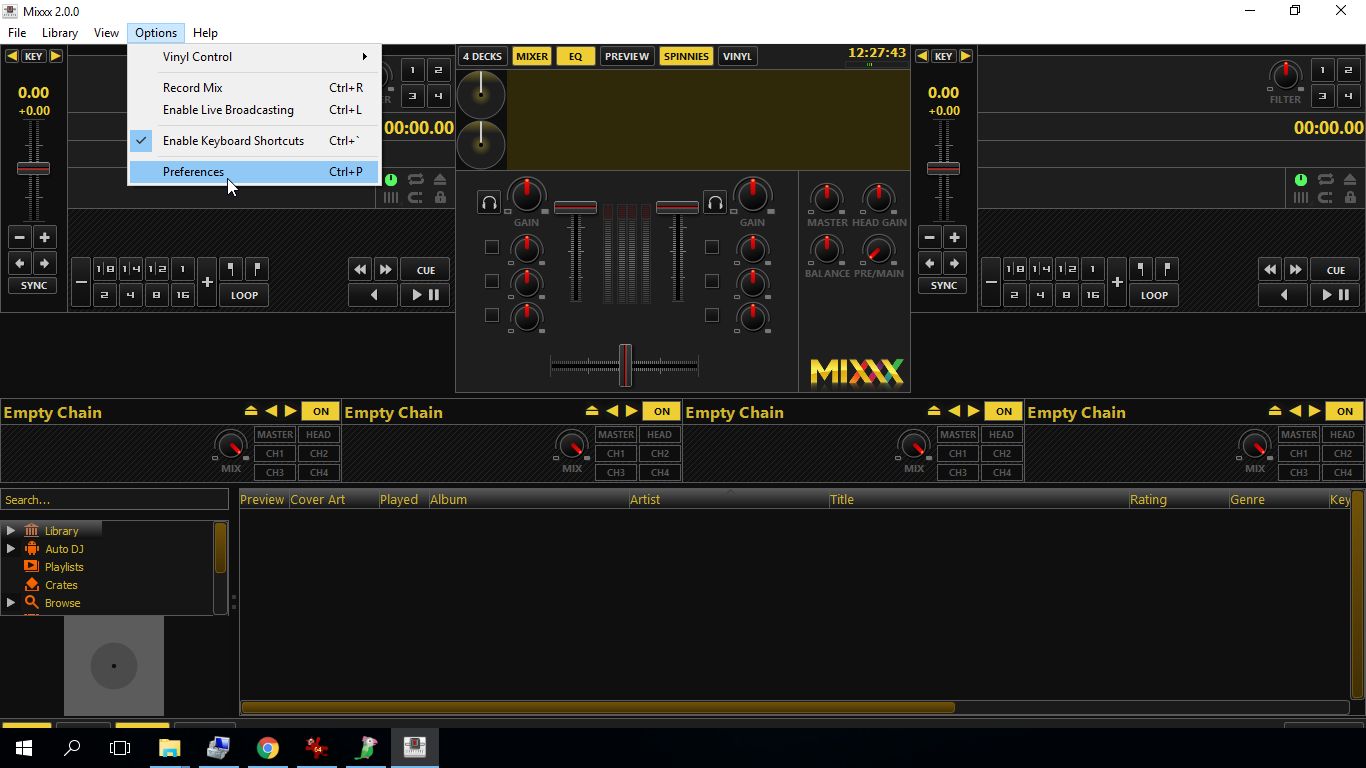


Important: Restart (close and open) Mixxx software after installing the codec.

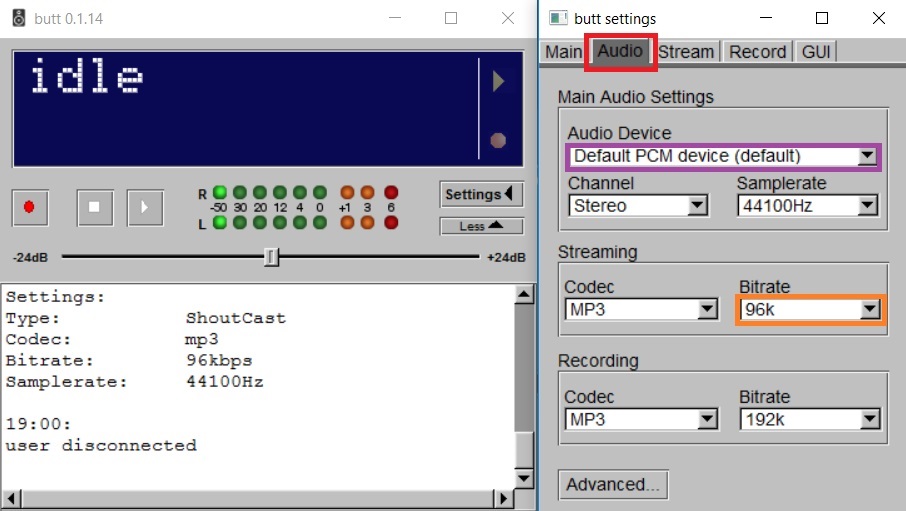
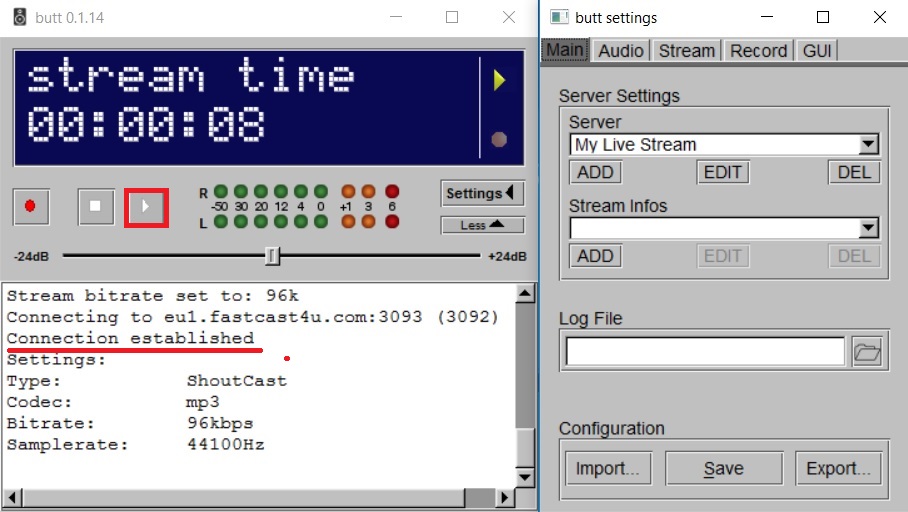
If you do not have all required software yet, download and install B.U.T.T. (Broadcast Using This Tool). If you would like to use AutoDJ and broadcast live using BUTT, you need to create at least one DJ account in Centova Cast Control Panel by selecting the DJ option in the menu of Centova Cast Control Panel. Restart the server after adding each DJ account. Only one DJ can be connected to the server at the time. If you do not use the AutoDJ feature or have a server without AutoDJ, you can skip this first step. 3. Open B.U.T.T software and select Settings Even if you use SHOUTcast V2 server, we recommend connecting in the Shoutcast v1 mode: Select the Audio Device and adjust the broadcasting bitrate and make sure that it does not exceed the maximum broadcasing bitrate for your server: 8. Make sure that the sound level indicators are going up and down, that means that you are ready to broadcast 9. Hit the play button and, if you are connected to the server successfully, you should see the a Connection established message and idle state will change to stream time
This simple app does not allow creating any playlists, so it can be used to broadcast the sound from your microphone, line-in input, an external mixer of from a different software.
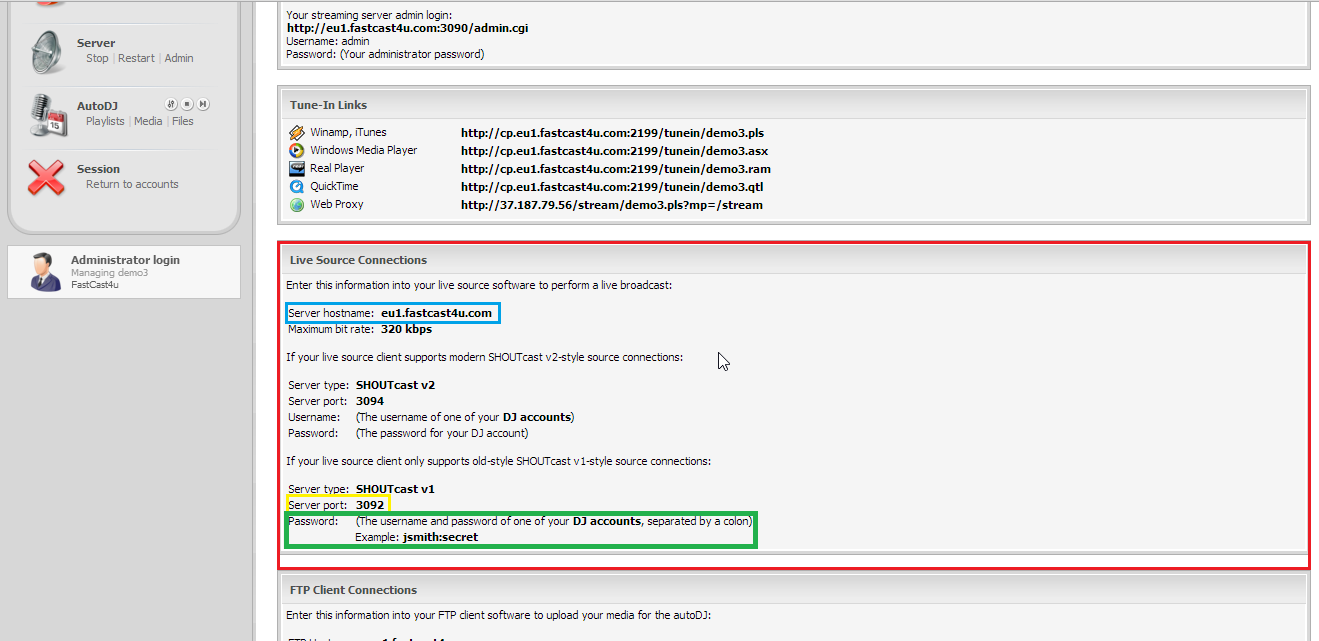
1. Before you start the configuration process, log in to the Centova Cast Panel and select the Quick Links section. 
2. Find ShoutCast/Icecast server details under Live Source Connections: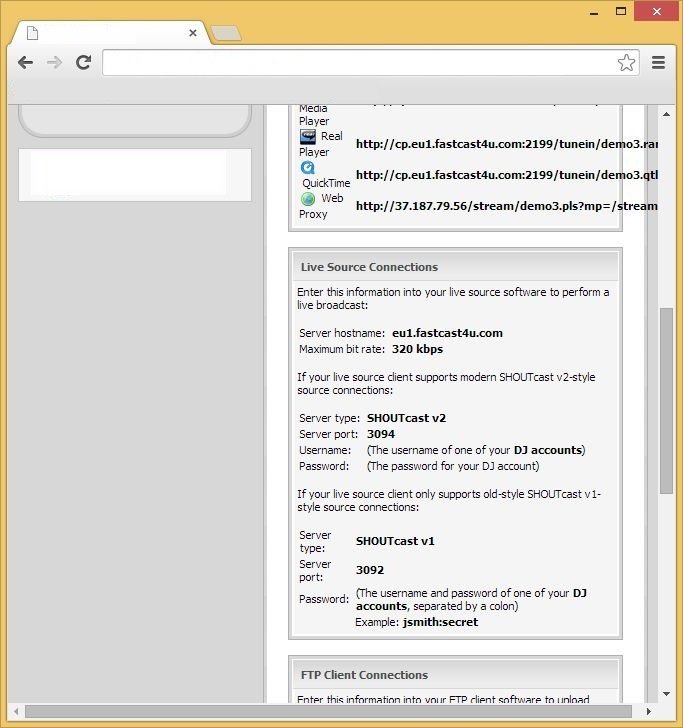
Check this tutorial to see how to create DJ accounts
4. You should be able to view the Settings page as presented below, select ADD Server
5. Open your Cantova Cast Panel to copy the encoder settings to BUTT like presented below: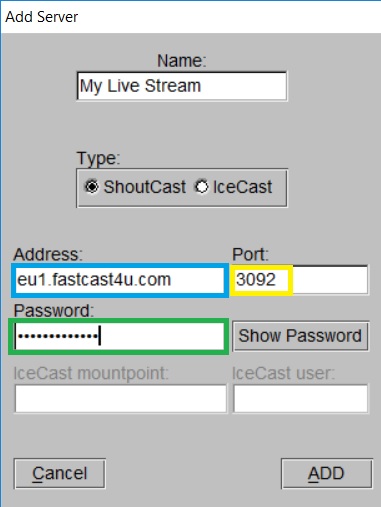
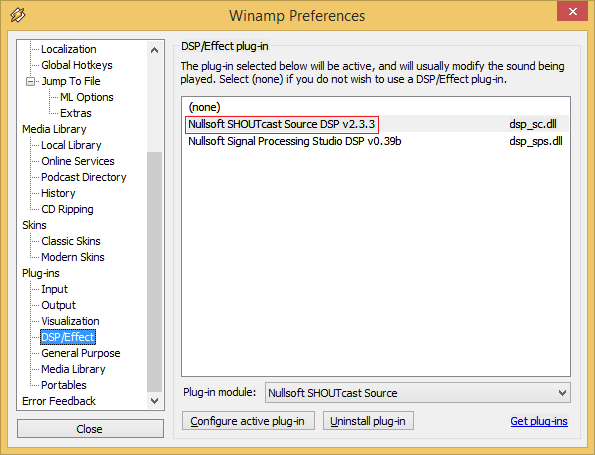
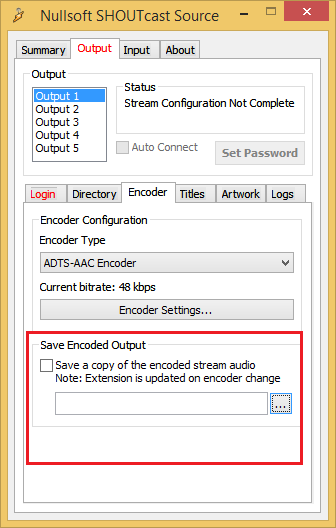
If you do not have all the required software yet, you can easily download Winamp and SHOUTcast DSP Plugin from our website. Open Winamp with a DSP plugin installed. If your DSP plugin did not open, then push CTRL + P and enter DSP/Effects under Plug-ins tab. Then just double click Nullsoft SHOUTcast Source DSP. A window with a bitrate slider will open. Select an appropriate bitrate. Remember, not to exceed your maximum limit, you can easily check it in Centova Cast Control Panel. If you wish to record and save your stream, Select "Save Encoded Output", and choose the location where it should be saved.
Before you start the configuration process, log in to the Centova Cast Panel and select the Quick Links section. 
Find ShoutCast/Icecast server details under Live Source Connections:
You should be able to view Winamp with a DSP plugin like presented below: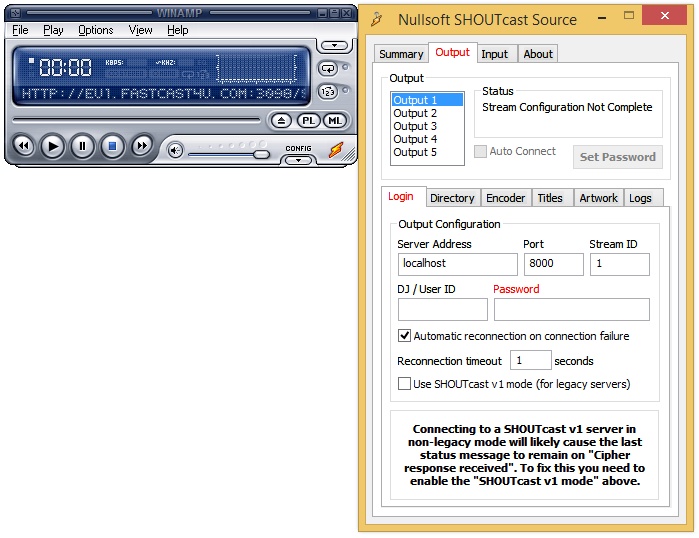
You will see an Encoder Settings button if you selected the AAC codec or a list with Encoder Settings if you selected MP3.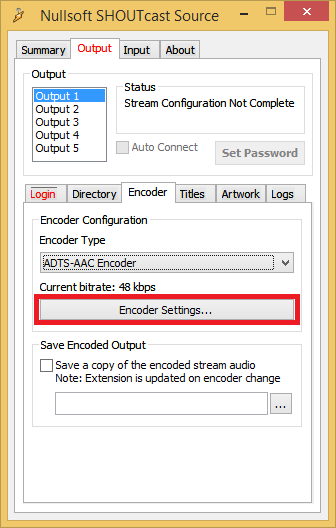

(Note: If you use Auto DJ the bitrate of your live stream should match the bitrate set up for Auto DJ) 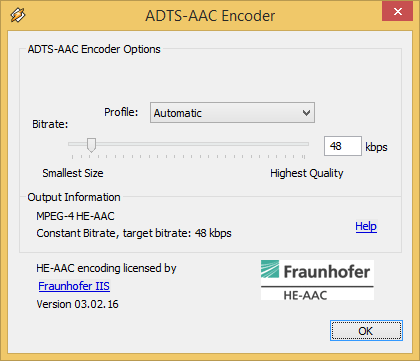
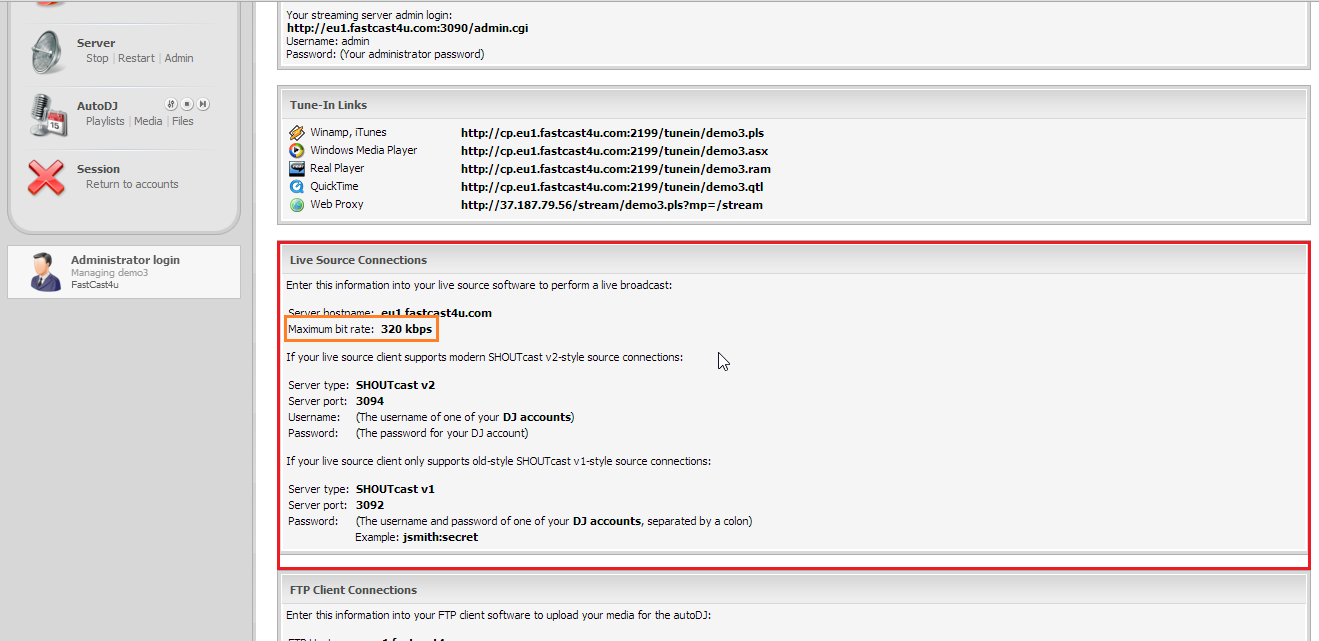
The maximum bitrate for your server is visible here:
To connect to a Shoutcast v2 server, enter details marked on a screenshot below. You need to enter the server address, port, DJ username, DJ password and Stream ID (mount point number, the default setting is "1").

Yes, the machines for free radio servers are shared. The limits guarantee machine stability and prevent outages. After a grace period of 3 days, you need to keep your audience above 3 listeners per 3 days - if you don't generate the traffic, your account will be stopped after 3 days. Stopped servers will be terminated after 7 days of inactivity. The current limits for the free radio servers are: - up to 100 listeners connected at one time,
- 96 kbps maximum broadcasting bitrate,
- 1GB AutoDJ space per Server,
- 1 Radio Channel per Server.
Absolutely, it's possible. Without utilizing the video chat feature, you can still enjoy our HTML5 radio. For a small monthly subscription fee of 5 euros, visit Centova Cast radio plus server - Create Your Own Online Radio Station.
There's no catch; we created this service for online radio enthusiasts. You can try online streaming, share your favorite music, or become a radio DJ, all for free.
Our website offers users the possibility to create a personalized chat, integrable on different platforms such as Wordpress, Joomla, Ip.board, Drupal, Socialengine, Youdate.website and much more. With our personalized chat, users can create a unique chat experience, adding emoticons, GIFs, customized backgrounds, and much more.